I’m Saraemi (@saraemiii_EN), a Japan-based illustrator creating VTuber models and VTuber-related artwork.
Live2D and VTube Studio receive frequent updates, and with new features sometimes come unexpected issues.
In this article, I’ll explain common problems and how to solve them.
I hope this guide helps you enjoy a smoother and more comfortable VTuber experience!
Preparing Your Model Data & Important Notes
Any settings you adjust inside VTube Studio like in this guide—will be saved and overwritten in the model data located in the import destination folder.
🔰You Can Replace Your Data via “Import Your Own Model”
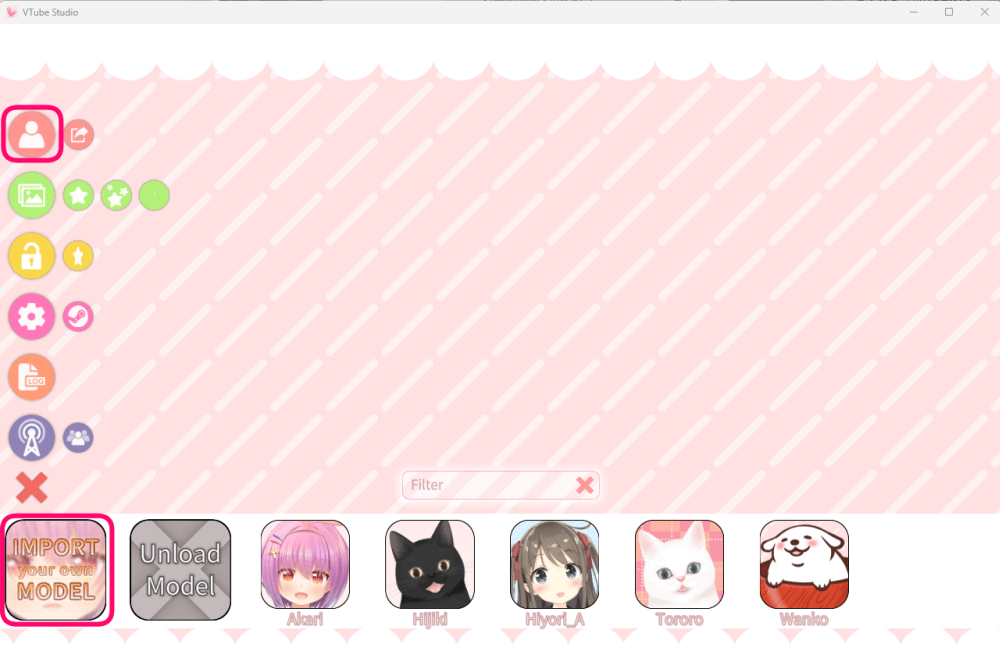
Go to:
Double-click the model → Menu → Top option “Change VTS Model” → Import Your Own Model
This will open the folder where the imported model data is stored.
In the beginning, I often had trouble finding this folder, so don’t worry if you get lost at first💦
When importing model data, make a copy of the original files
Always keep a backup of your important model data.
When importing your model, avoid using the original files directly copy and paste them instead.
If you keep a backup, you can simply re-import the data if something goes wrong with your settings in VTube Studio.
This is especially important when your model was created by a commissioned artist, as expression and pose switch settings may already be configured in the original data.
Experienced VTube Studio users can usually reset these settings, but for new VTubers, redoing them can take a lot of time and losing them entirely would be a serious problem!
Once you finish adjusting your settings in VTube Studio, make another backup!
Any settings you change inside VTube Studio will overwrite the model data in the import destination.
After you’ve fine-tuned everything to your liking, be sure to back up the imported model data again.
Handle parameters with care!
Parameter adjustments can be quite complex, and changing them without fully understanding may cause your model to behave strangely.
To make sure you can revert things quickly, note down the original values before changing them, or, in the worst case, restore your setup by reinstalling from a backup.
Simple checks you can do before changing any settings
Camera position and lighting
- The camera may be tilted and not capturing your face properly
- The room may be too dark for the camera to recognize you
These issues are surprisingly common, so make sure to double-check them first.
Calibrate
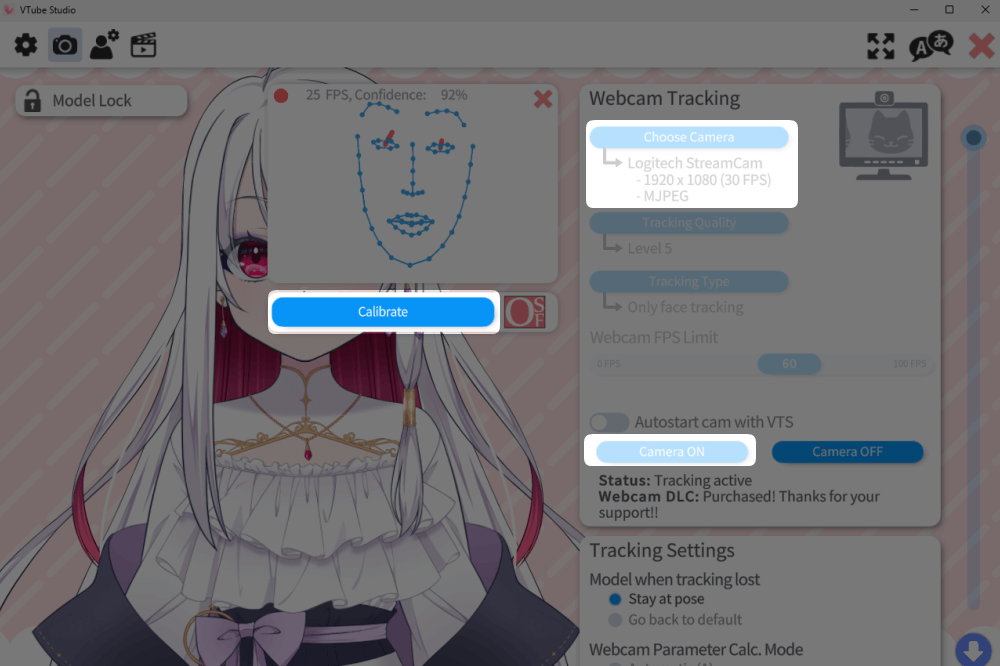
If the camera’s facial recognition calibrate is off, your tracking may be inaccurate.
Click it again to recalibrate.
Go to:
Menu → Gear Icon → Camera Icon → Camera ON
A calibration window will appear.
The model sways forward and backward → Turn off “Movement Config”
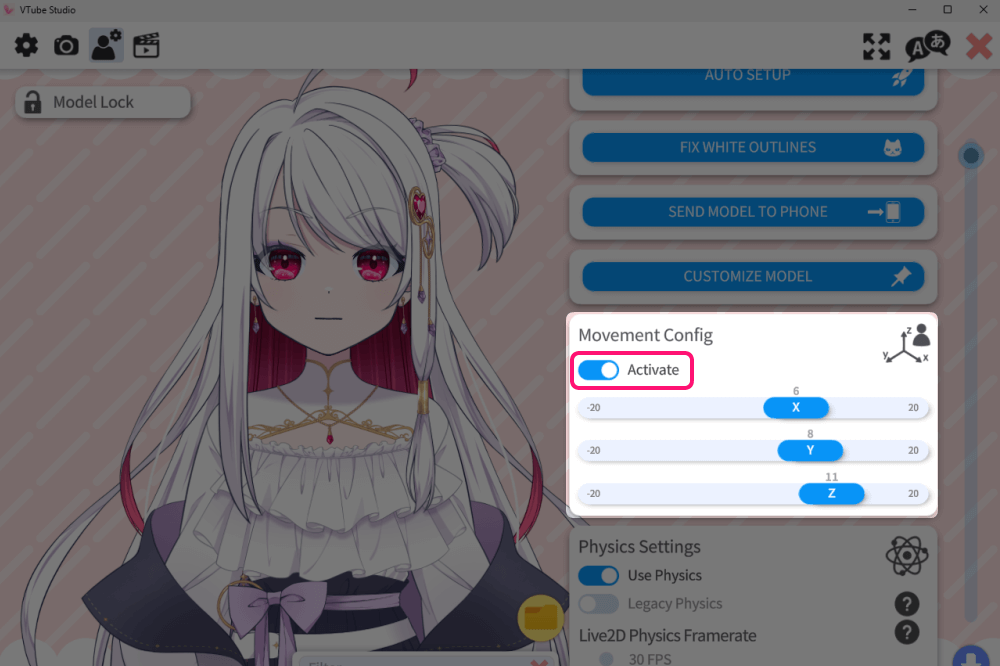
If your model moves back and forth or zooms in unpredictably, it may be because Movement Config Distance is enabled.
If you don’t need it, turn “Activate” to OFF.
Blushing for no reason → Delete “Blush when smiling”
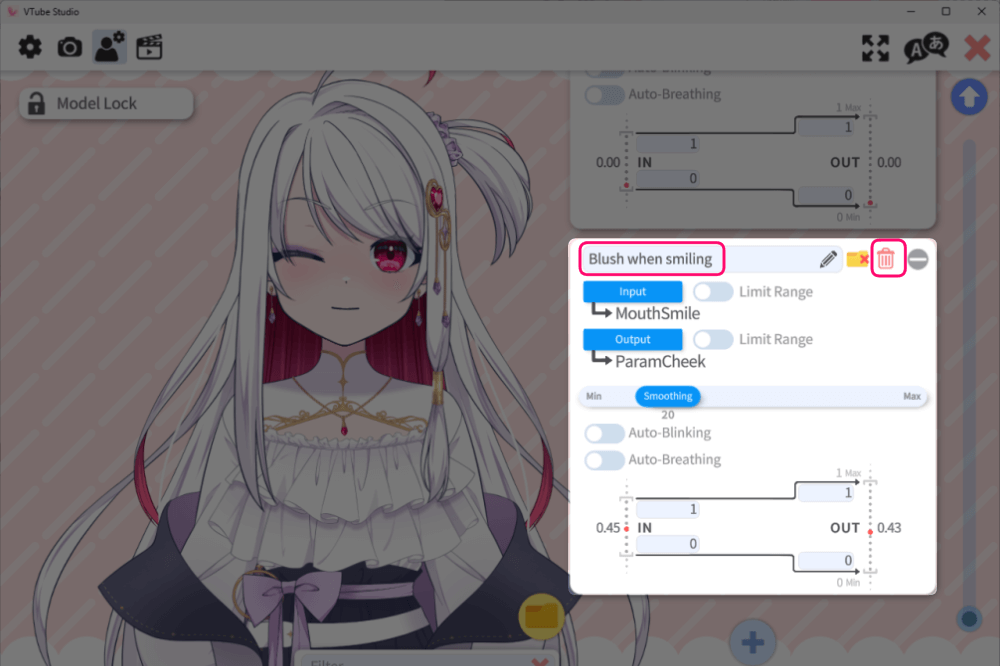
Right after importing your model, it may appear blushing even when you’re not doing anything.
At the moment, this is the most common error caused by the current specifications of VTube Studio and Live2D.
You can safely delete “Blush when smiling” by clicking the trash-can icon.
No issues will occur.
Blushing is normally triggered via Keybinds, such as pressing a specific key, so removing this default setting will not affect normal usage.
Blinking one eye at a time → Set to “Always”
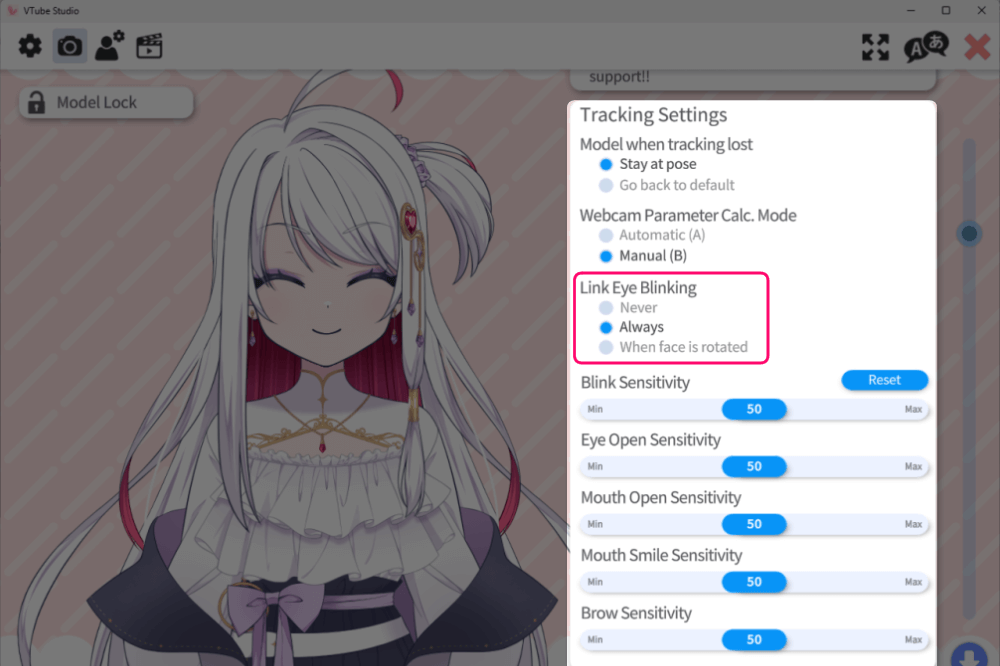
If your model blinks each eye separately and it feels unnatural, go to Tracking Settings and enable “Always”
This will fix the issue.
If you are wearing glasses, the camera may have trouble tracking your blinking accurately.
In that case, try either removing your glasses during setup or adjusting the following settings:
- Eye-open sensitivity
- Sync both eyes when at an angle
- Blink sensitivity
Eyes not looking forward → Adjust “Eye Y”
Sometimes simply running Calibration fixes the gaze immediately, so try that before changing any settings!
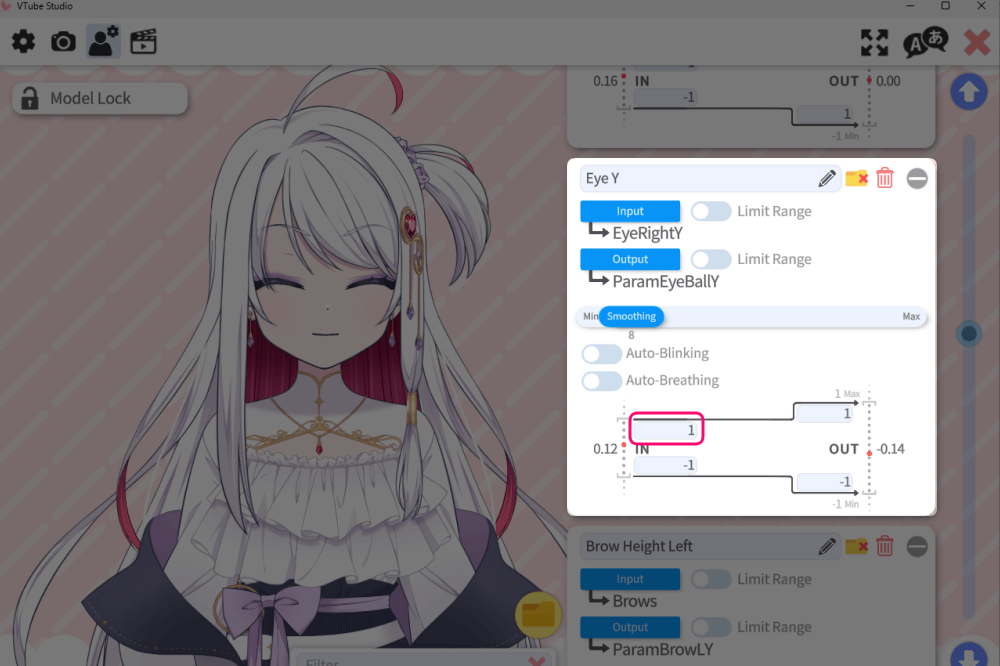
Adjust Eye Y to control the vertical position of the pupils.
The default value is usually 1 (top-left number).
If your model is looking upward, increase the value.
If it’s looking downward, decrease the value.
This Eye Y issue is also a fairly common problem.
If the gaze is shifted left or right, you’ll need to check Eye X, but in most cases, Calibration alone resolves horizontal gaze issues.
対処法5:目が半目になる →『Eye Open~』を調整
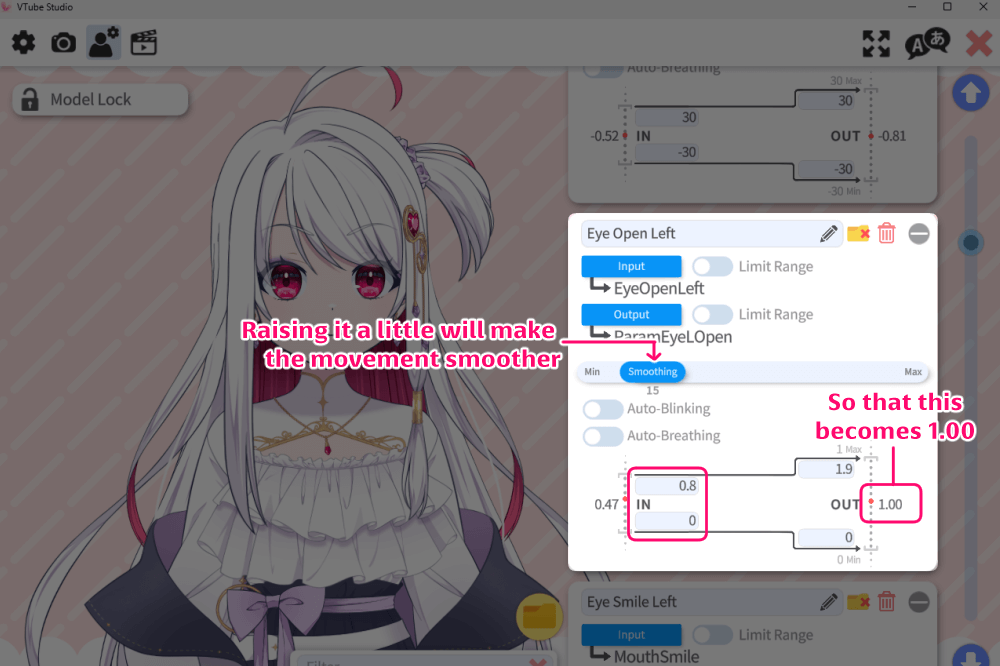
You can find the Eye Open~ settings under:
Gear Icon → Person Icon, near the upper-middle area.
Lower the numbers on the left side until the value on the far right reaches 1.00.
A recommended approach is to gradually lower the top-left value from 1 down to around 0.5 first.
If it still feels off, adjust the bottom-left value as well.
For many people, adjusting only the top-left number is enough to fix the issue.
If your blinking looks too snappy or “flappy,” try increasing Smoothing, which is located above these settings.
Closed eyes look like a straight line → Adjust “Eye Smile~”
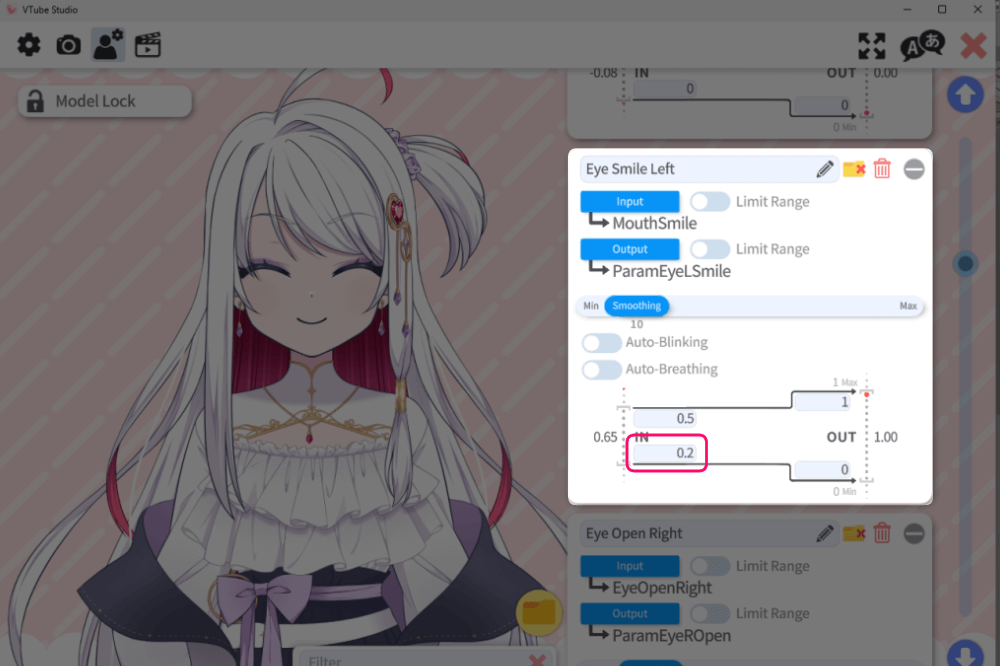
If your closed eyes appear unnaturally straight—like the right eye in the example—try gradually increasing the bottom-left value of Eye Smile Left and Eye Smile Right to around 0.5.
Eye Smile~ controls the “smiling eyes” shape.
If it’s left at the default value of 0, the smiling-eye parameter can pull the eyelids into a straight shape.
On the other hand, if you want your closed eyes to always look like smiling eyes, raising the value to 2–3 will apply the effect.
Mouth movements don’t match → Use “Lipsync“
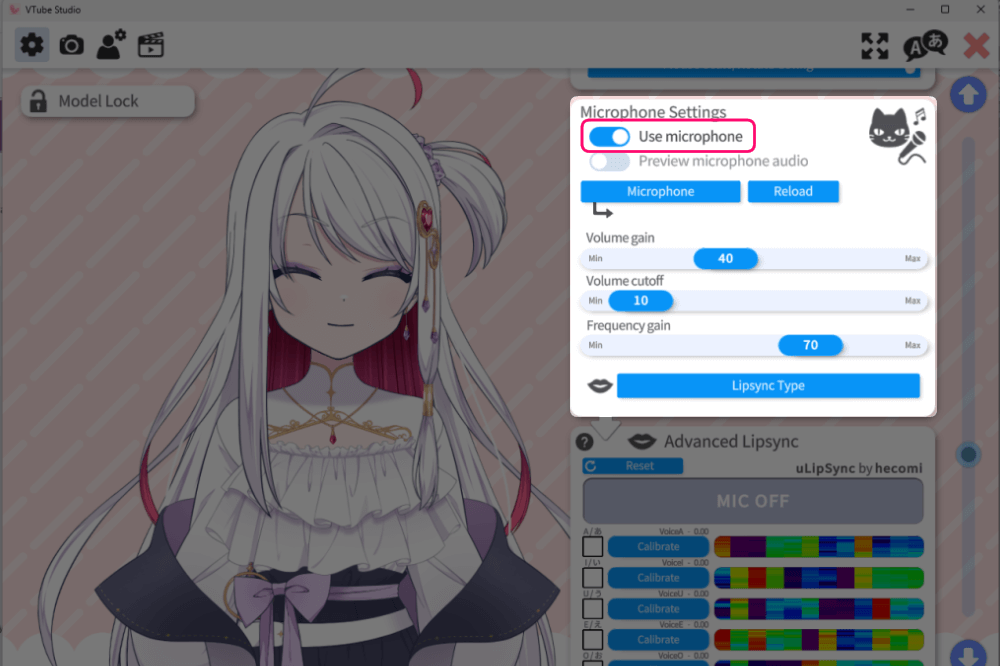
When your mouth doesn’t move while talking, it’s often because the camera alone cannot accurately detect mouth shapes.
Most people don’t open and close their mouths very widely during normal speech, so the model may not register movement even when you’re clearly talking.
By enabling Lip Sync, VTS will detect the vowels you pronounce and reflect them in your mouth movements, making lip sync much more accurate while speaking.
First, go to Lip Sync Settings and turn on “Use Microphone.”
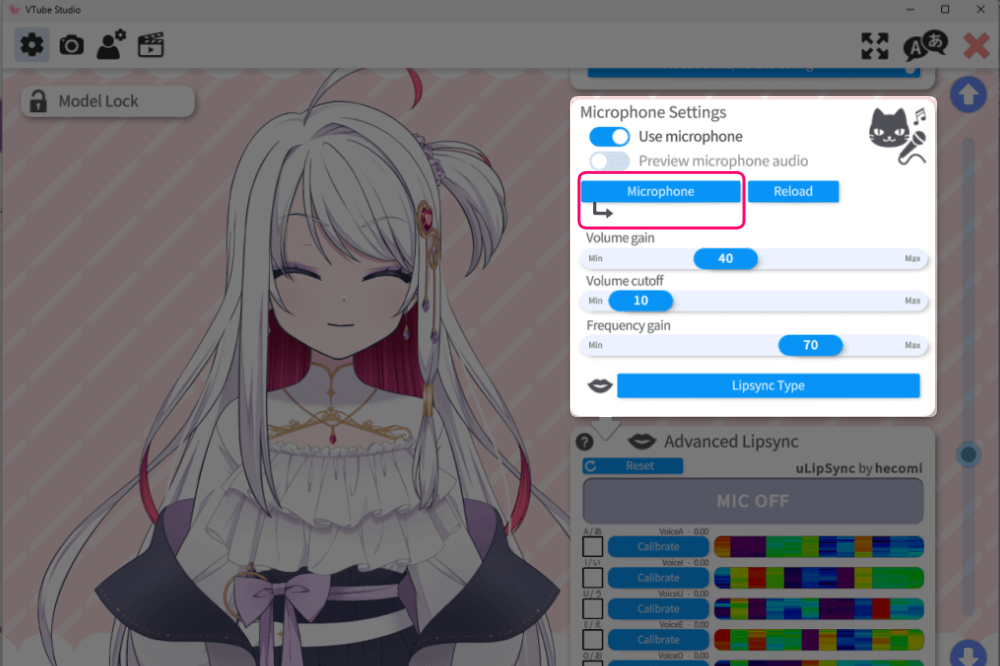
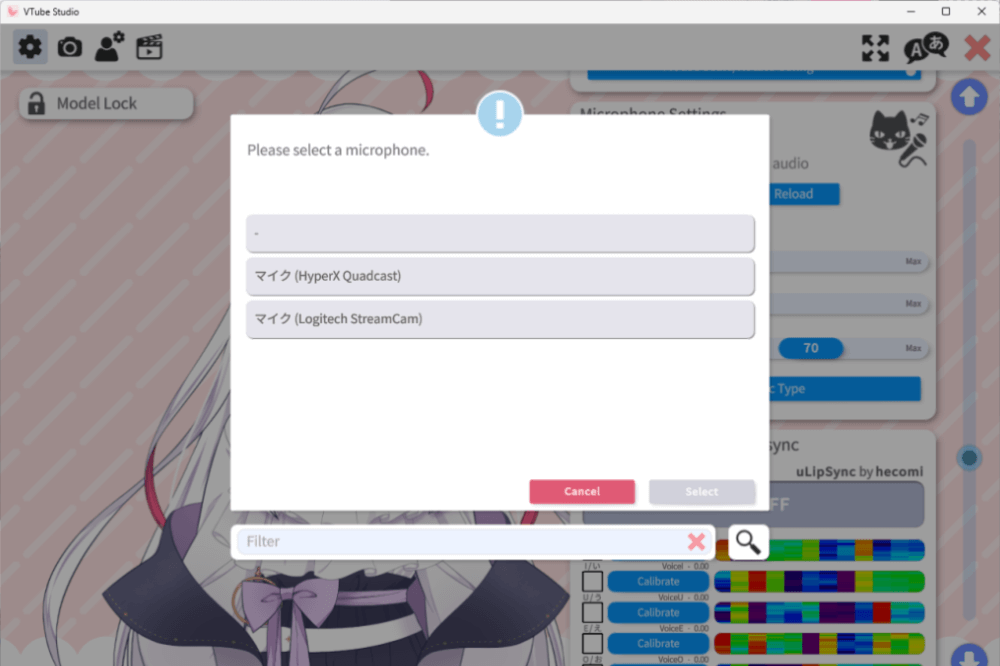
Select the microphone you want to use under “Microphone.”
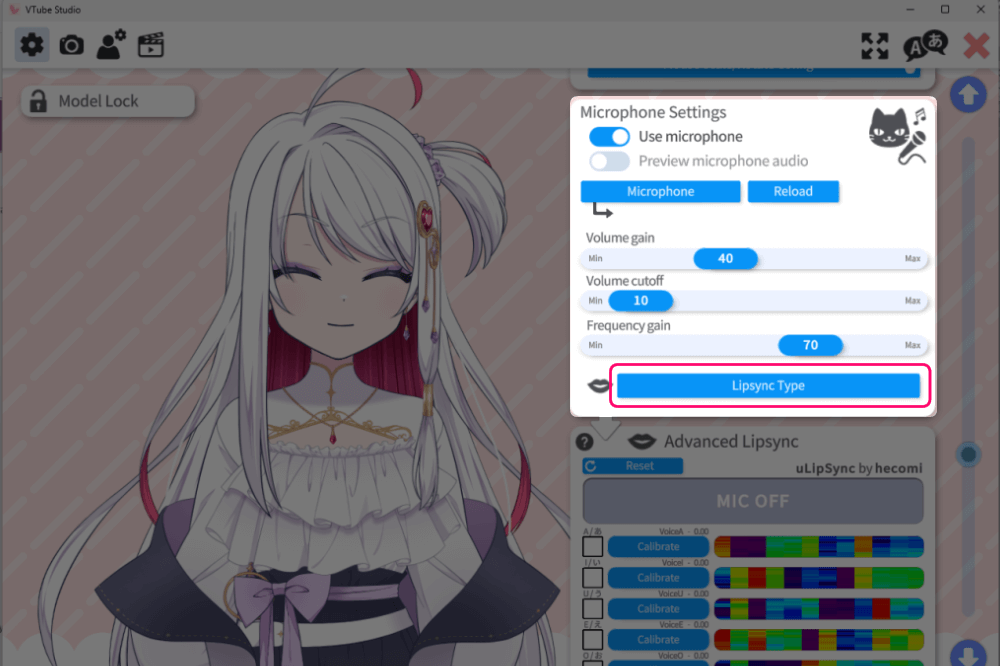
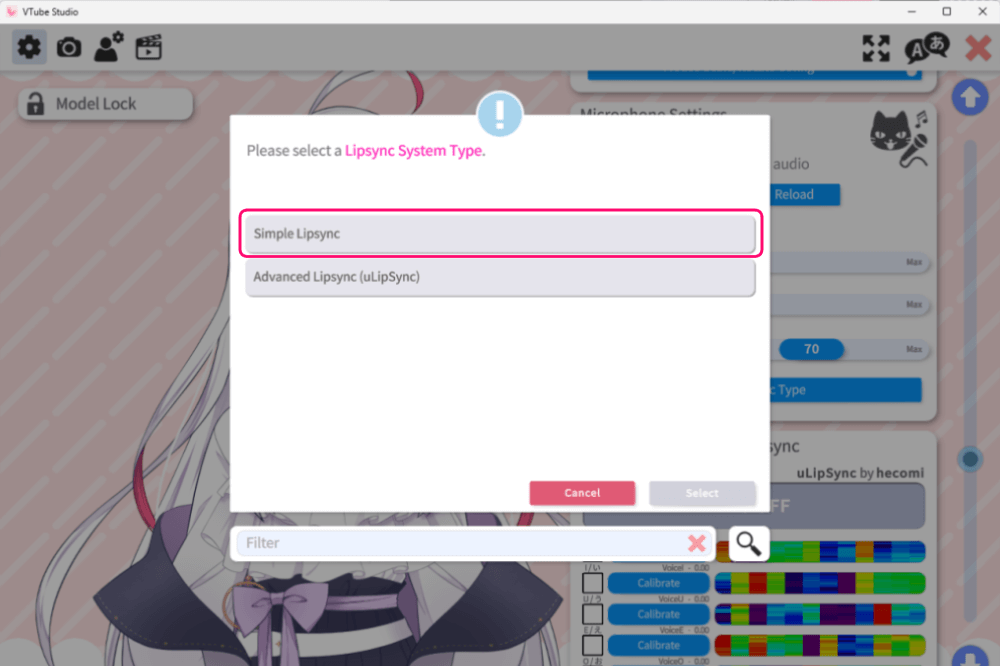
For Lipsync Type, choose “Simple Lipsync.”
The other option, “Advanced Lipsync” only works with highly specialized model data that includes dedicated parameters.
Most VTuber models are not compatible with it.
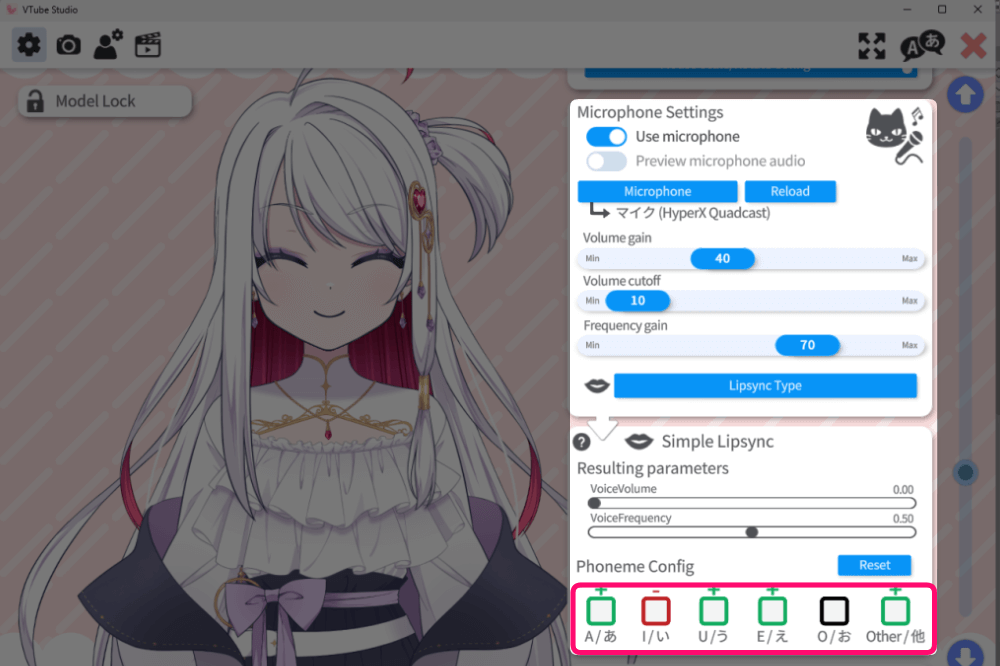
Next, face your microphone and say “A I U E O.”
Check the Phoneme Settings to see whether each vowel reacts (the box will turn black when detected).
This may be different from my native language!
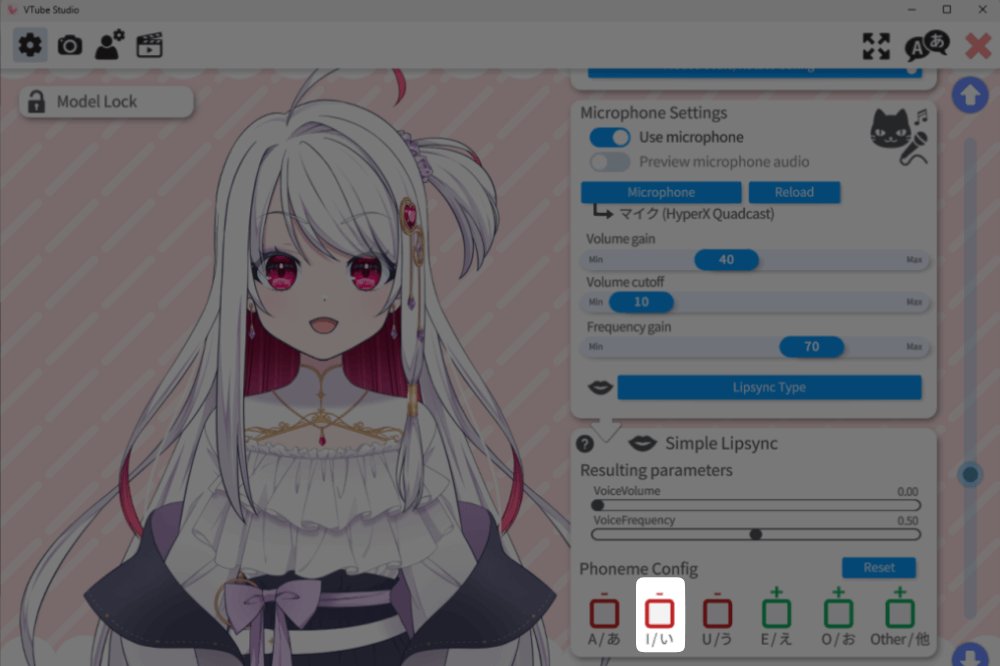
If a vowel doesn’t respond well, click its square to change the color, then test again.
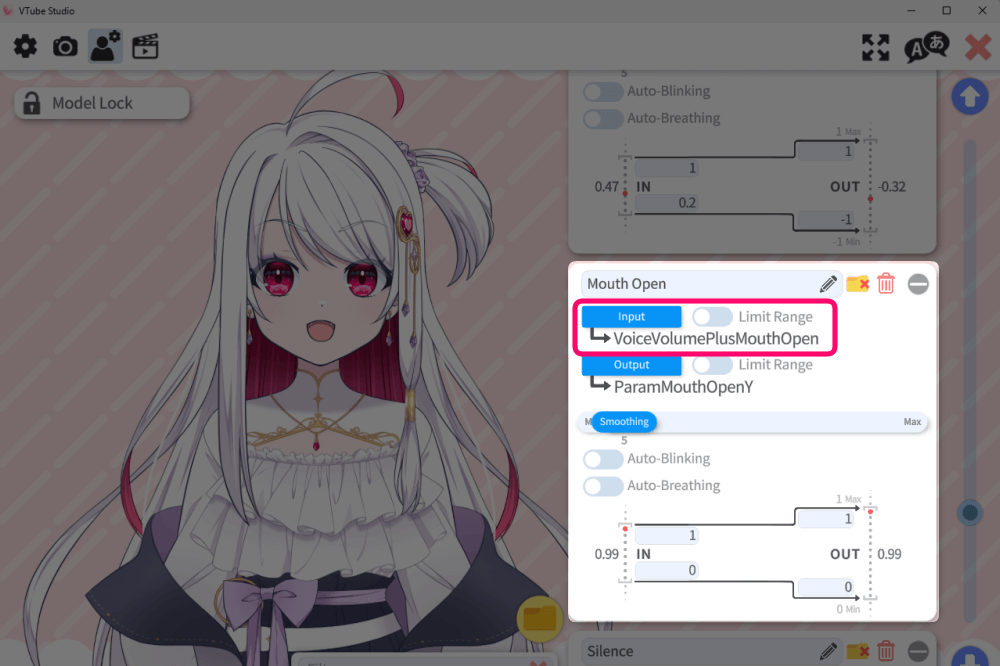
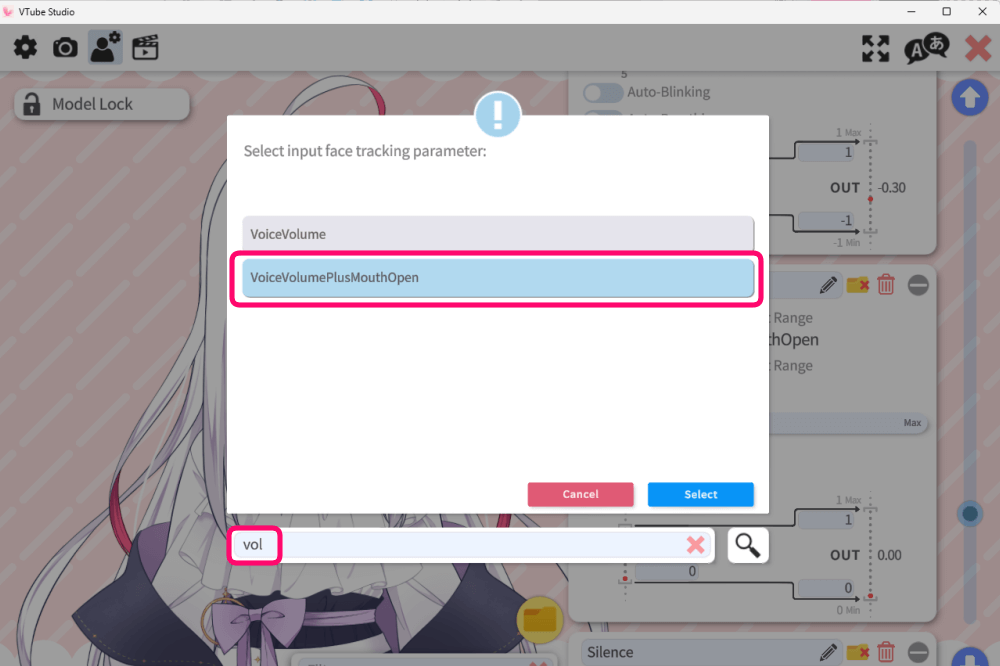
Under the Person Icon, open Model Settings → Mouth Open, then click the IN button and select “Voice Volume Plus Mouth Open.”
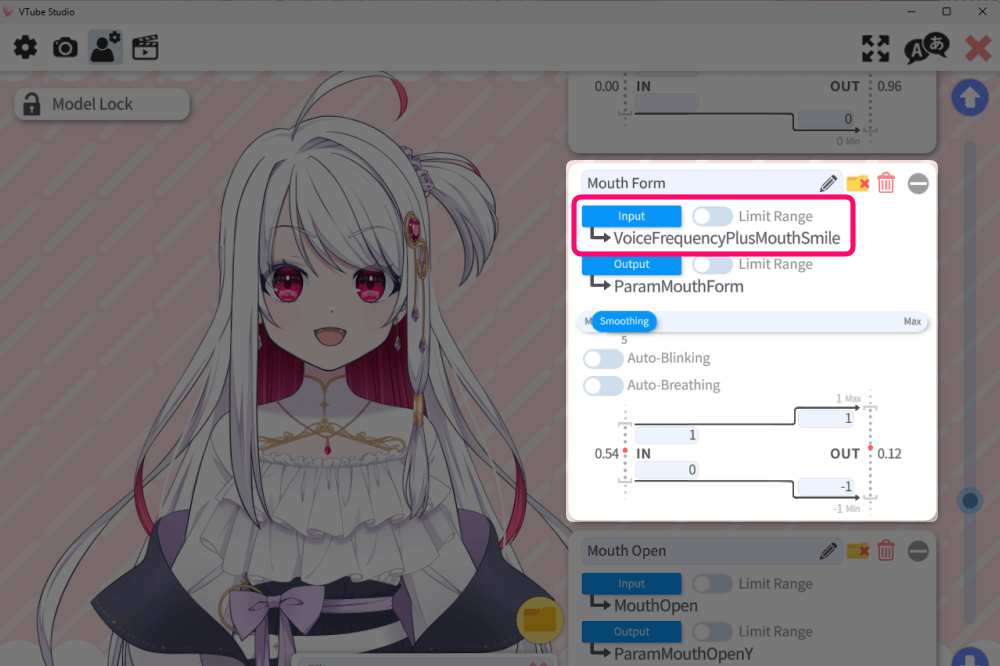
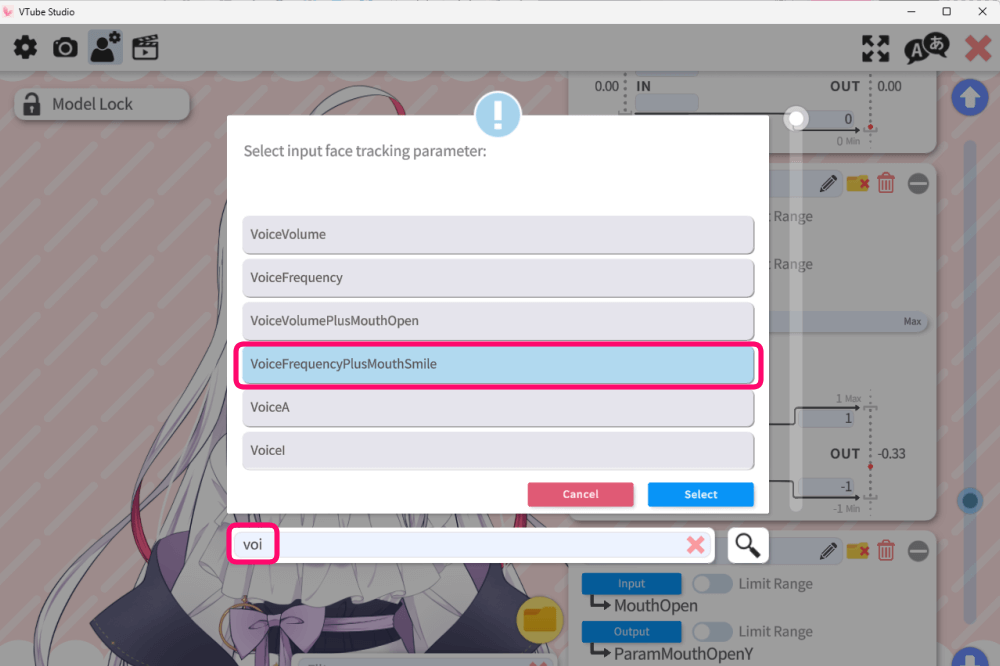
For Mouth Form, choose “Voice Frequency Plus Mouth Smile.”
Even after adjusting my tracking settings many times, my mouth still wouldn’t move properly when speaking…
But once I enabled Lipsync, my model finally started responding correctly!
Mouth looks expressionless when open → Adjust “Mouth Form”
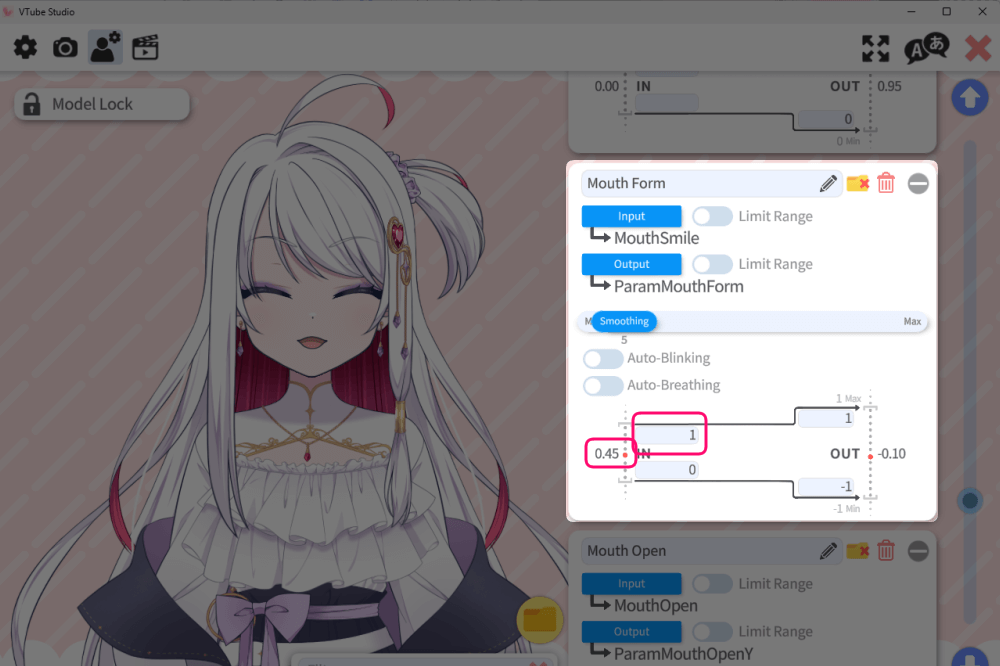
If your open mouth tends to look too round, adjust the top-left value of Mouth Form from the default “1” down to around 0.4–0.7.
If you move the red dot on the gauge (to the left of IN) upward more easily, the mouth will take on a more smiling shape.
Since mouth shapes depend not only on camera recognition but also on how the creator designed the model, feel free to adjust this area to match your preferred style.
Remove the small mascot character in the bottom-left corner → Purchase the dedicated DLC
You can remove both the logo and the small floating mascot by purchasing the additional DLC.
Go to the VTube Studio page on Steam, then open the DLC section.
Scroll down the DLC list and…
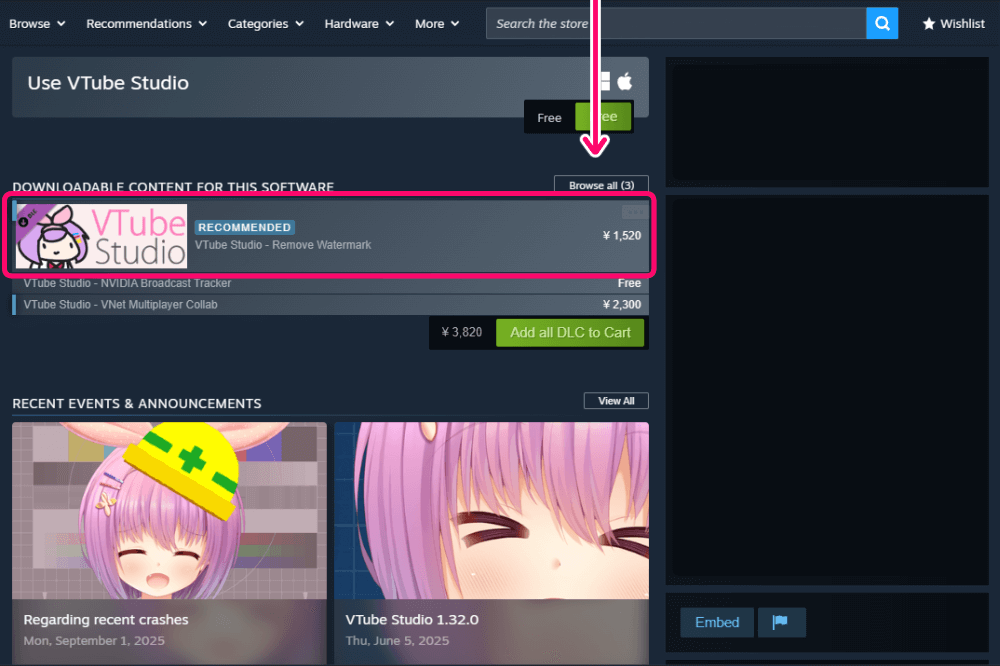
You’ll find the option under “REMOVE WATERMARK.”
You can purchase it there.
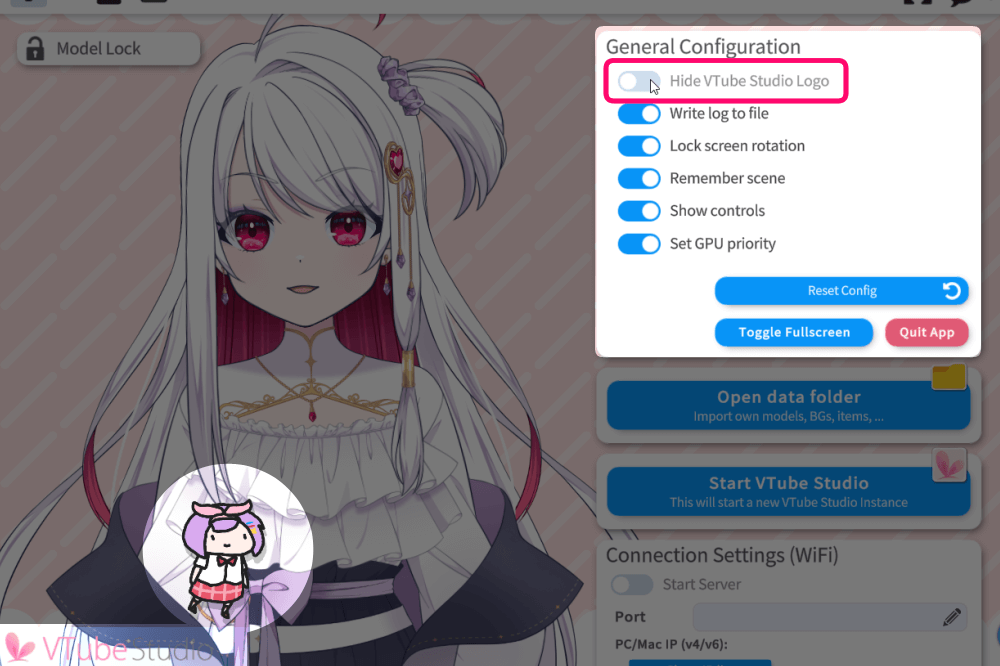
Once purchased, go inside VTube Studio and turn on “Hide Logo” via : Gear Icon → General Settings
This will remove both the logo and the small mascot character.
Add an Icon to Your Model
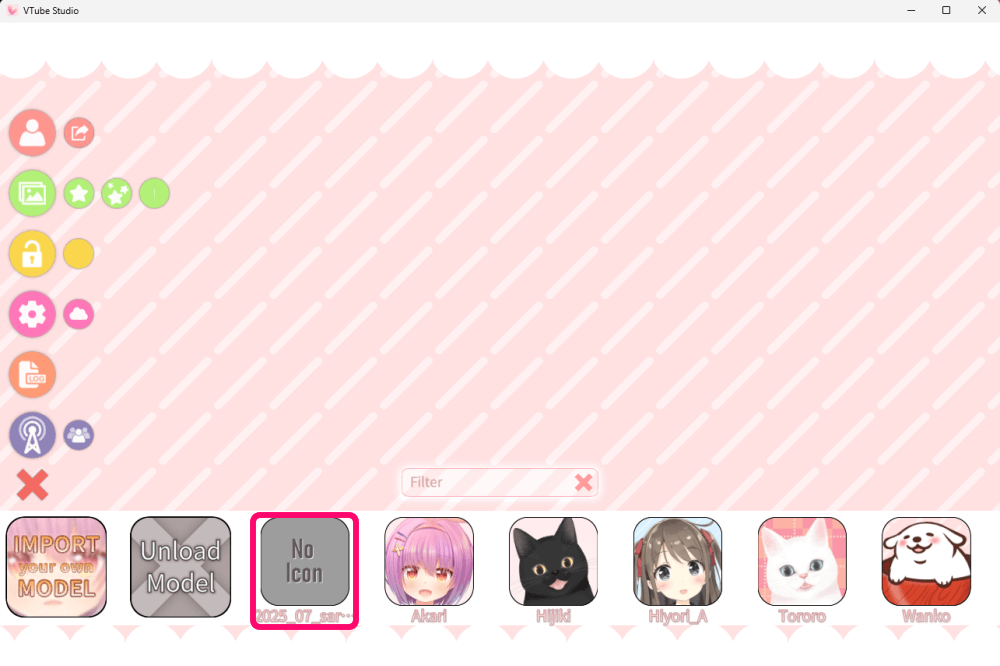
When selecting a model, it can be hard to tell which one is which if no icon is set.
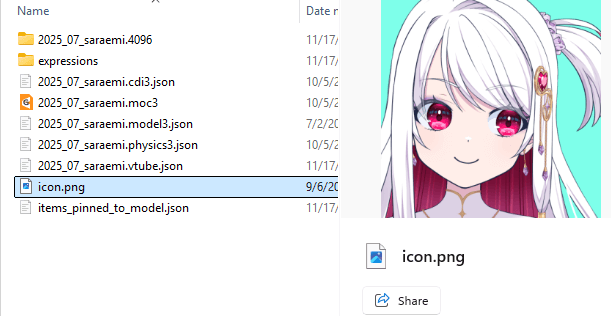
Place your icon image inside the model’s import destination folder.

Then go to:
Gear Icon → Person Icon, and click the “No Icon” image shown in the top right.
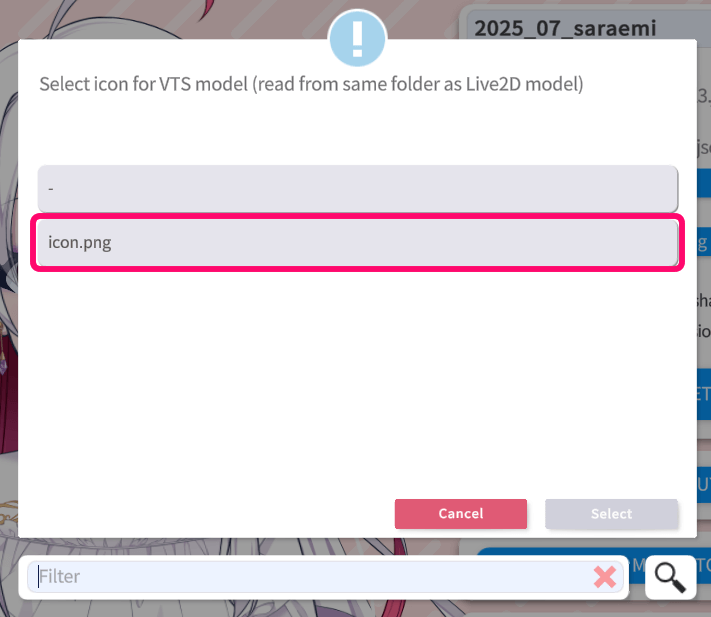
You’ll see the image file you added earlier—select it, and it will be applied as the model’s icon.
Thank you for reading to the end
I hope this overview helps you enjoy a smoother and more comfortable VTuber experience!
In addition to creating VTuber models, I also provide illustrations for main visuals, MVs, merchandise, and more.
If you’re interested, feel free to contact me through VGen or the contact form.